GraphQL Backend Using TS And TypeORM - Implement Entities and Mutations | Pt. 2
Learn how to register a new user to your database using GraphQL and TypeORM
Add Data to Your DB Using TypeORM and GraphQL Mutation
In the last post, you learned how to set up a GraphQL server using GraphQL Yoga and TypeOrm . In this post, you will learn how to register a user to your database using GraphQL Mutations.
You will first implement TypeORM entities to mirror your users' schema, connect to your database, and then implement the needed mutations to register your users.
The first thing you need to do is to build the users' entity, let's see how.
Implement TypeORM
TypeORM is an ORM that can run in NodeJS, Browser, Cordova, PhoneGap, Ionic, React Native, NativeScript, Expo, and Electron platforms and can be used with TypeScript and JavaScript (ES5, ES6, ES7, ES8).
Update tsconfig Settings for TypeORM
Go to src -> entity -> User.ts
You'll notice a number of squiggly lines under your properties:
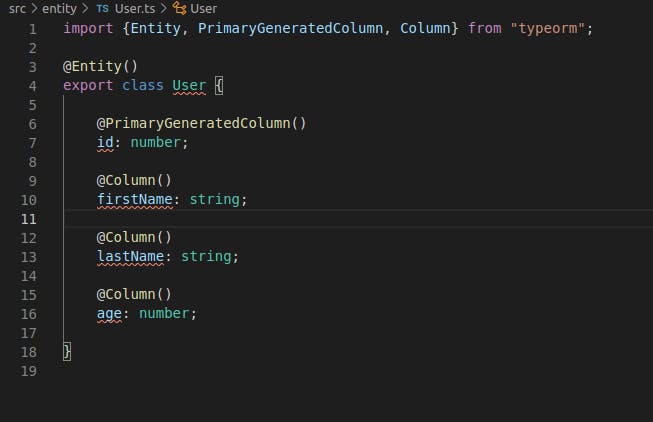
To solve the errors in your TyperORM User entity file, you'll need to change a couple of settings in the tsconfig.json.
First, add:
// tsconfig.json
"experimentalDecorators": true,
"emitDecoratorMetadata": true,
And change:
"strictPropertyInitialization" : false,
Modify the User.ts entity
Back to the user's entity file, it's time to tell TypeORM how the User class should look like.
🛑 NB: An entity represents a table in your DB. Every propriety will be a column, every row will be an instance of this entity.
You will need to store:
- ID
- Password
ID
To generate the IDs you will use a library called "uuid" that will take care of creating hexadecimal ids to improve security.
Let's install it:
yarn add uuid
N.B Makes sure to import uuid from the uuid library and not from the TypeORM one.
and import the library in the User.ts file:
// User.ts
import {v4 as uuidv4 } from "uuid"
Typescript will now complain about some missing types:
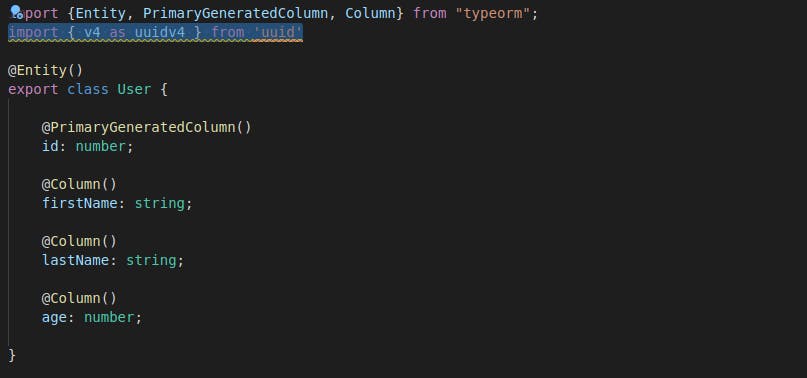
You'll need to install the uuid types to allow Typescript to interpret uuids:
yarn add @types/uuid
Now that the uuid library is imported, let's implement it:
- Add it as an argument to the id column
- Update the return value of "id" from number to string
- Import BeforeInsert module from TypeORM
- Call the uuidv4 function in the BeforeInsert subscriber
// User.ts
import {Entity, PrimaryGeneratedColumn, Column, BeforeInsert } from "typeorm"';
import {v4 as uuidv4 } from "uuid"

@Entity()
export class User {
    @PrimaryGeneratedColumn("uuid") #specify the column type inside the brace
    id: string;

    @Column()
    firstName: string;

    @Column()
    lastName: string;

    @Column()
    firstName: string;

   @BeforeInsert()
   addId(){
       this.id = uuidv4()
   }

}
You can define a method with any name in entity and mark it with @BeforeInsert and TypeORM will call it before the entity is inserted.
Learn more about the BeforeInsert and other subscribers here
Now that you have finished setting up the users' id, let's complete the User entity with the email and the password.
Email and Password
Let's declare the types of email and the password fields, respectively removing the "first name" "last name" and "number" fields:
- The email field will be of type varchar(255)
- The password field will be of type text
Extend the User class with the BaseEntity superclass imported from TypeORM. This will implement different methods such as:
- create()
- find()
Pass a string into the entity decorator to give a name to the DB table
// User.ts
import {Entity, PrimaryGeneratedColumn, Column, BaseEntity } from "typeorm";
import {v4 as uuidv4 } from "uuid";

@Entity("users")
export class User extends BaseEntity{
    @PrimaryGeneratedColumn("uuid")
    id: string;

    @Column("varchar", { length: 255 })
    email: string;

    @Column("text")
    password: string;

    @BeforeInsert()
    addId(){
       this.id = uuidv4()
   }

}
Now that column types and return values have been declared, it's time to configure the DB connection.
Connect to Postgres
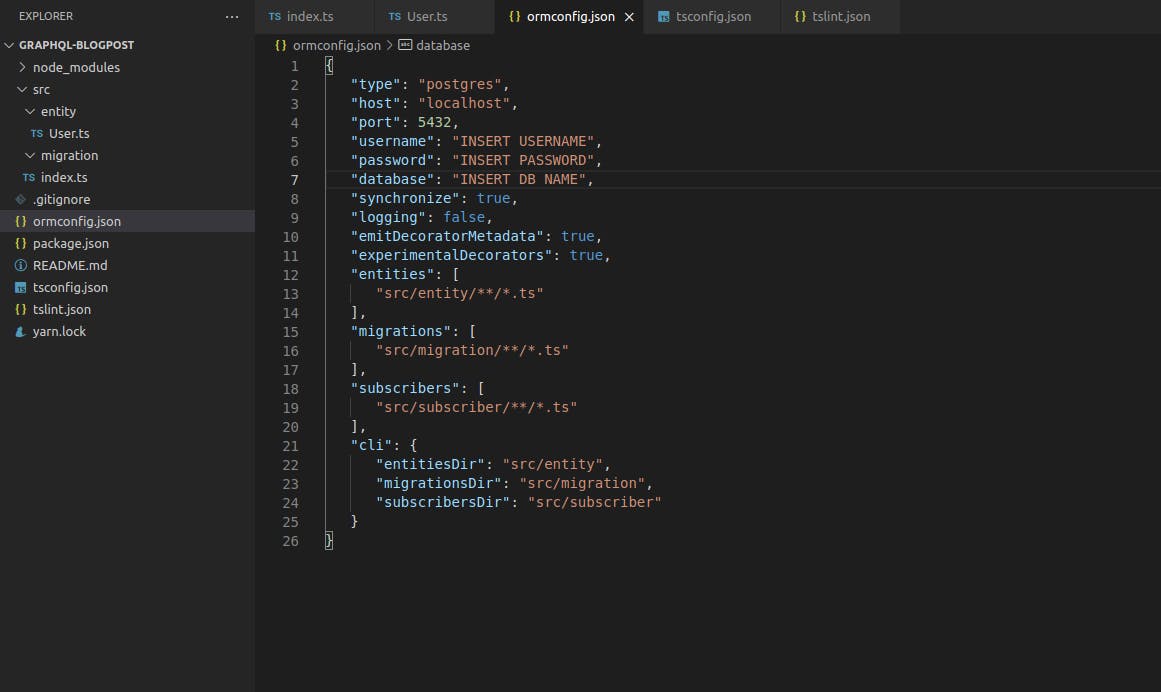
Browse to /ormconfig.json
Replace:
- Username
- Password
DB name
And check if the "synchronize" setting is set to "true".
Browse to the index.ts file and create a connection to the database:
- Go to src -> index.ts
- import { createConnection } from typeorm
- call createConnection() and .then() start the server
//  index.ts
import { GraphQLServer } from 'graphql-yoga'; // Import the library
// import the createConnection function
import { createConnection } from "typeorm";

const typeDefs = `
  type Query {
    hello(name: String): String!
  }
`

const resolvers = {
  Query: {
    hello: (_ : any, { name } : any) => `Hello ${name || 'World'}`,
  },
}

// Wrap server.start() withing createConnection()
createConnection()
.then(() => {
    const server = new GraphQLServer({ typeDefs, resolvers })
    server.start(() => console.log('Server is running on localhost:4000'))
})
Now run
yarn start
This will synchronize your TypeORM entities with your DB creating a table for each entity.
From psql:
- Connect to the database specified in the ormconfig.json file
- List all the tables using \d
- List all the columns in the "users" table using \d users
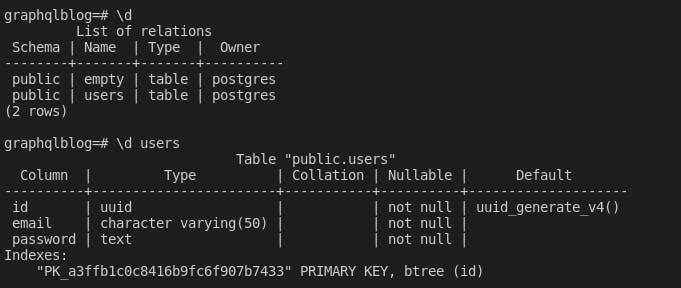
As you can notice, in the DB you will now have a table called "users" with the columns specified in the User.ts entity file.
🎉🎉 Congratulations! You've now connected your Postgres Database to a working instance of a GraphQL - TypeORM server 🎉🎉
It's now time to tidy everything up before moving on to GraphQL Mutations.
Add Users Using GraphQL Mutations
To add users to the DB you'll use GraphQL Mutations, but first, install a library to avoid any complaint from typescript about types:
- gql2ts -> GraphQL to Typescript
Install gql2ts
gql2ts will:
- Take a type schema to generate TS interfaces
Take a type schema & query and generate TS interfaces
To set up gql2ts move all typeDefs definitions to a graphql.schema file, this will also keep everything much tidier:
- Create a new file called schema.graphql inside the src folder
- Create a new folder /src/types
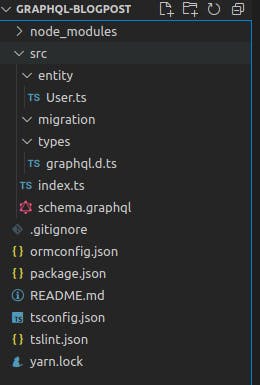 cdn.hashnode.com/res/hashnode/image/upload/..)
Inside the schema.graphql file, move your typedefs definition found inside index.ts:

Import .graphql Files
Unfortunately, you can't import the schema.graphql file into the index.ts yet, because Babel isn't aware of what a .graphql file is.
To import a .graphql file install a library called:
- graphql-import-files
Copy-paste the following code to your project terminal:
yarn add graphql-import-files
Inside your index.ts file, import the loadFile function from the graphql-import-files library:
#index.ts
import { loadFile } from "graphql-import-files"
and change your typeDefs declaration to:
#index.ts

const typeDefs = loadFile("src/schema.graphql")
- Add gql2ts to your "scripts" in package.json, right under the start script:
"scripts":{
    "start": "ts-node src/index.ts"
    "gen-schema-types": "gql2ts src/schema.graphql -o src/types/graphql.d.ts"
}
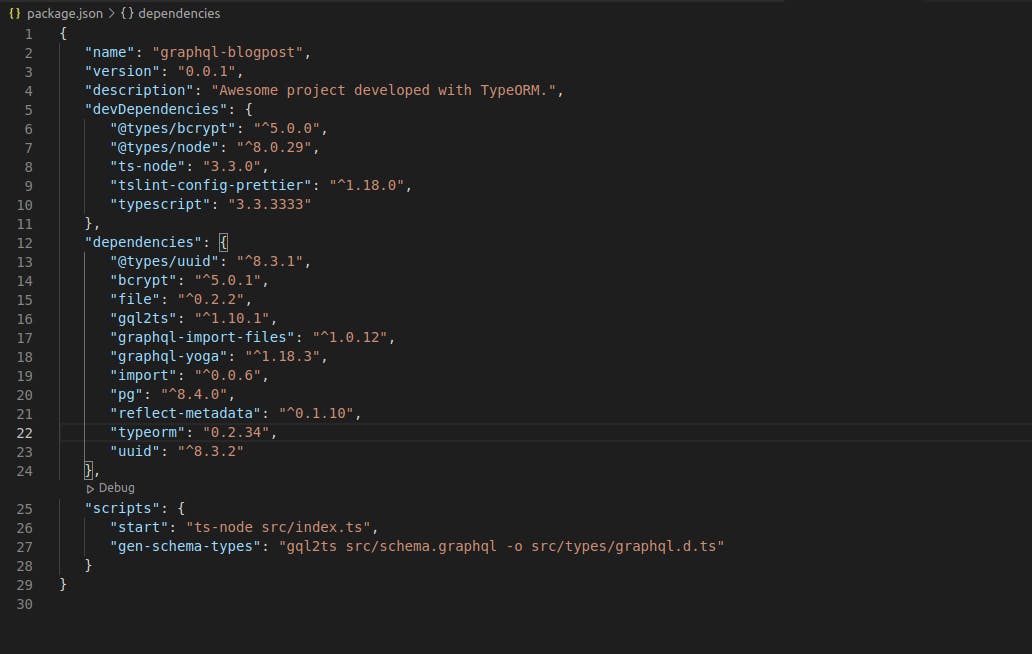
now run:
yarn gen-schema-types
This will populate your src/types folder with a file called graphql.d.ts that contains the derived types for your GraphQL mutations and queries.
It's time to substitute a couple of "any" types with the more appropriate ones.
Modify Query Arguments Type
Go to your index.ts file and under your resolvers constant change the type of the "name" argument of your "hello" query into GQL.IHelloOnQueryArguments:
#index.ts
const resolvers = {
  Query: {
    hello: (_ : any, { name } : GQL.IHelloOnQueryArguments) => `Hello ${name || 'World'}`,
  },
}
At this point your index.ts file should look like this:
# index.ts
import { GraphQLServer } from 'graphql-yoga'; // Import the library
import { loadFile } from "graphql-import-files";
import { createConnection } from "typeorm";

const typeDefs = loadFile("src/schema.graphql")

const resolvers = {
  Query: {
    hello: (_ : any, { name } : GQL.IHelloOnQueryArguments) => `Hello ${name || 'World'}`,
  },
}

createConnection()
.then(() => {
    const server = new GraphQLServer({ typeDefs, resolvers })
    server.start(() => console.log('Server is running on localhost:4000'))
})
and this should be your folder structure:
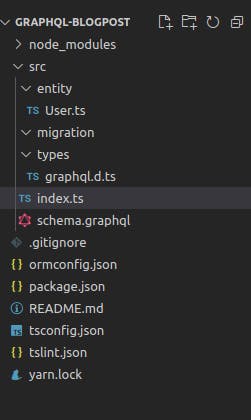
Add Your First GraphQL Mutation
Is now time to add some way to register users to the GraphQL Database.
Go into the schema.graphql file and add the following code right under your GraphQL query declaration:
#index.ts
type Mutation{
    register(email: String, password: String) : Boolean!
}
Now in the resolvers declaration (index.ts), it's time to add the mutation resolver to register new users.
You will also use bcrypt to hash passwords before sending them to the database. Install bcrypt using:
yarn add bcrypt
The register mutation will:
- Take an email and a password as arguments
- Hash the password
- Create a new user using the just created User Entity
- Save the user to the database
Add the following code to your index.ts file:
// index.ts
import { hash } from "bcrypt";
import { User } from "./entity/User";

const resolvers = {
    Query: {
      hello: (_ : any, { name } : GQL.IHelloOnQueryArguments) => `Hello ${name || 'World'}`,
    },

    Mutation:{
        register: async(_: any, { email, password } : GQL.IRegisterOnMutationArguments) =>{
             if(password && email) {
                 const hashedPassword = await hash(password, 10);
                 const user = User.create({
                     email,
                     password: hashedPassword
                 });
                 await user.save()
                 return true;
             }
             return false;
        }
    }
 }
The register mutation should be good to go, let's test this out in the GraphQL playground.
Start the server running
yarn start
In the left panel write:
mutation{
    register(email: "bob", password: "er")
}
And click the play button:
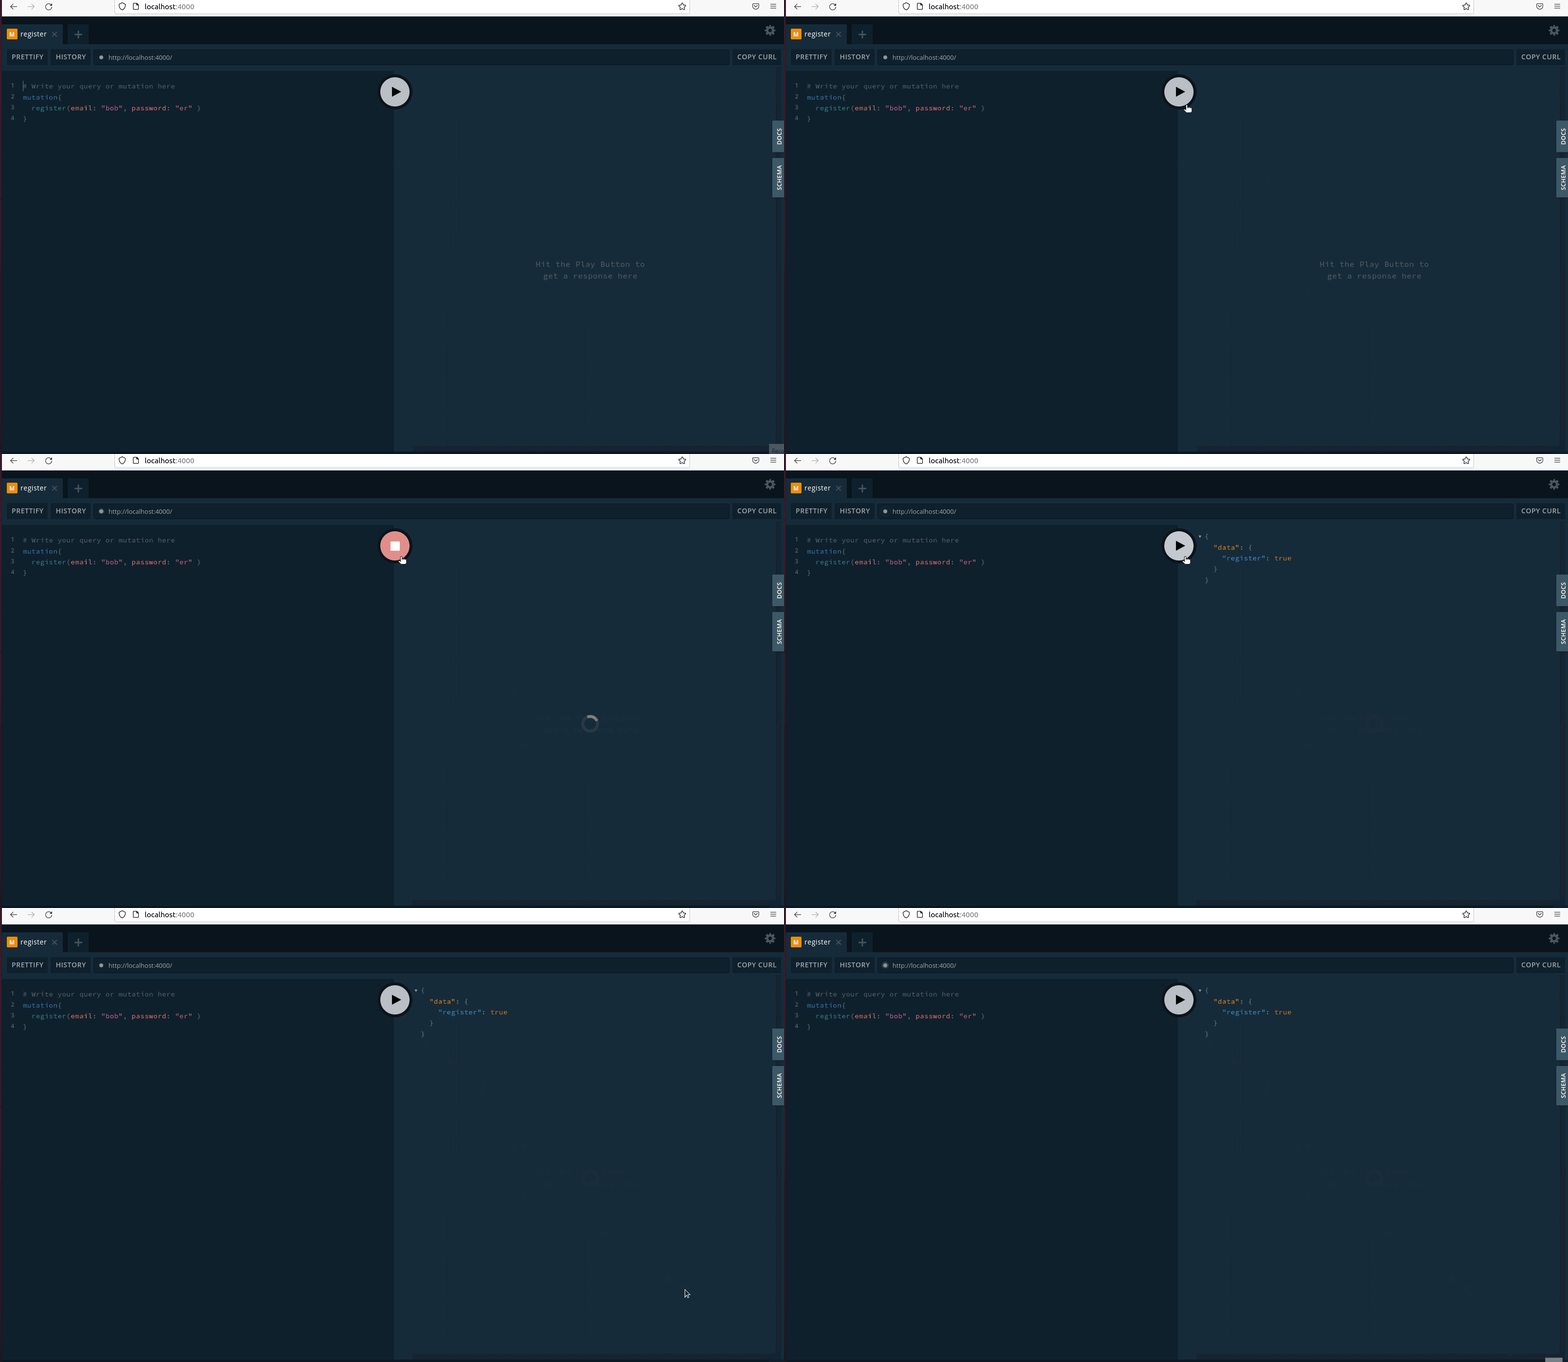
If everything works as expected, you should see "register: success" message from the response panel.
Check if the user has been created
You can now check if the user has been correctly created:
- Connect to your DB using psql
Run:
SELECT * FROM users
You should see the just-created user

Well done! You've just created your first user to your GraphQL server, using TypeORM and Typescript.
In the next post, You will learn how to use Jest to set up some testing and improve the reliability of your brand new backend!
Conclusions
In this post you've learned how to:
- Set up TypeORM to work with Typescript
- Create a TypeORM entity
- Connect TypeORM to your Postgres DB
- Install Typescript Types
- Perform GraphQL Mutations
In the next post, you will learn how to set up a Jest environment to test your GraphQL queries.
Hey! Thanks for reading!👋
If you liked this post:
- Leave a like.
- Consider sharing.
- Connect with me on Twitter! And drop me a DM.
Further Reading
Trouble Shooting
Having issues following the tutorial? Check the FAQ below 👇
PG Module is not installed
- TypeORM might require you to install the pg (Postgres) package, simply write in the console:
yarn add pg
StrictPropertyInitialization can't be changed
- If you need to keep your property initialization active:
#tsconfig.json "strictPropertyInitialization": true,User.ts @Column ('text') password!: string;
Error using declare namespace GQL
In the MyProject/src/types/graphql.d.ts file you might get an error about "declare namespace module":
- Change "declare namespace GQL" to:
#graphql.d.ts export namespace GQL - Add import {GQL} to the index.ts file:
index.ts
import { GQL } from './types/graphql'
